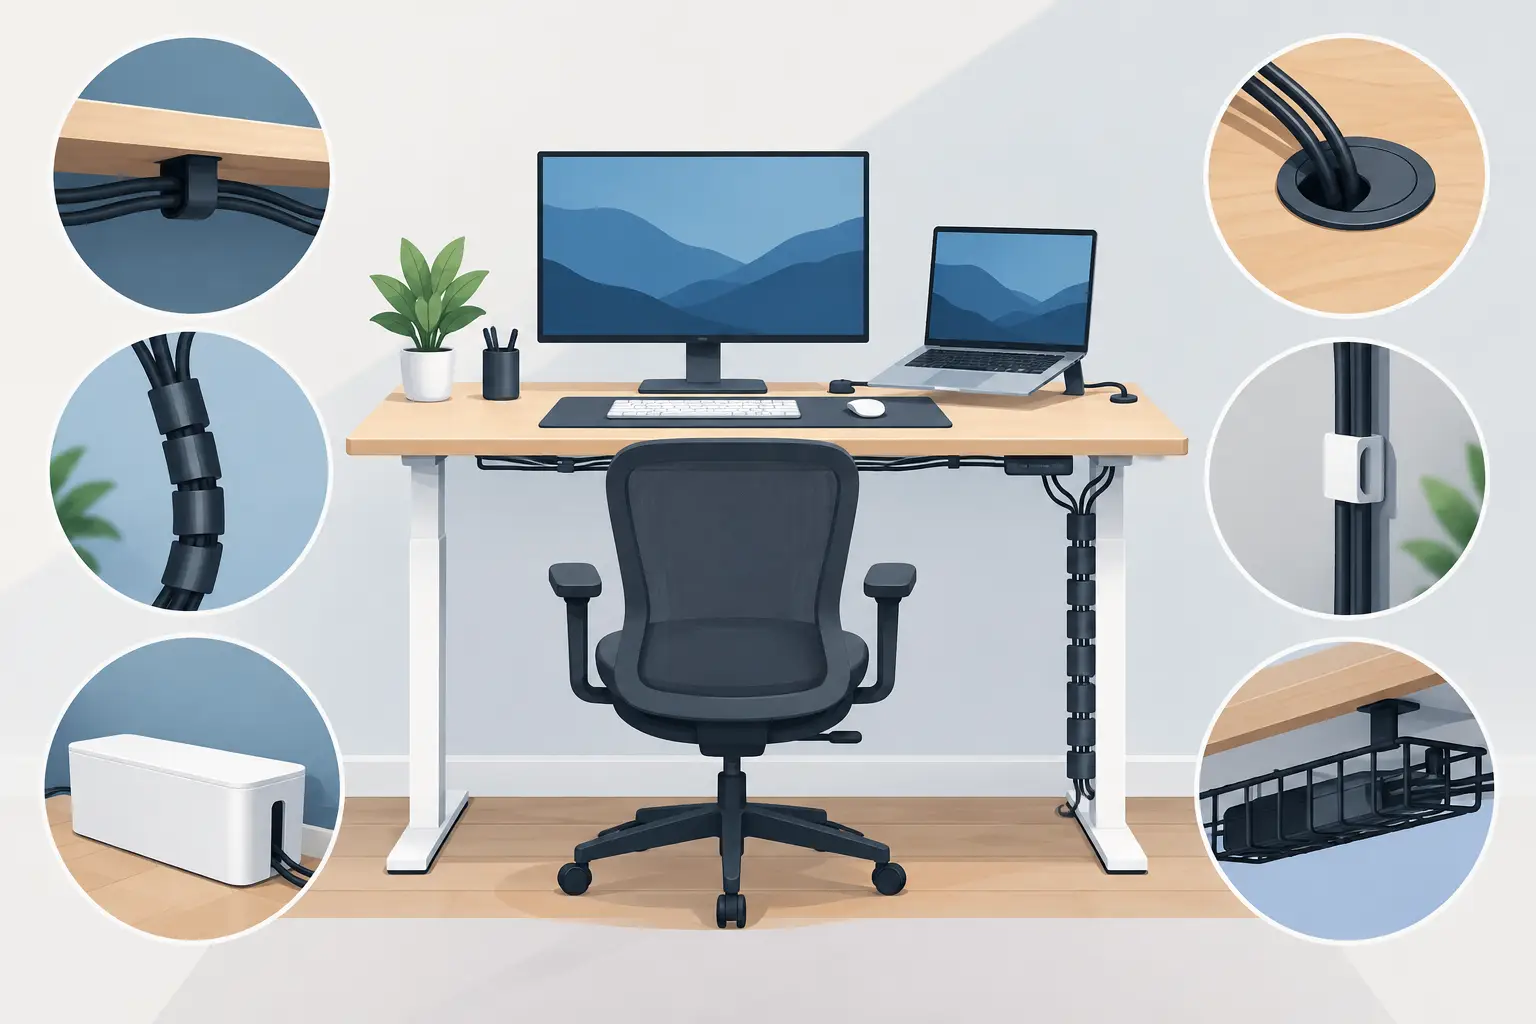
A desk can have a powerful computer, dual monitors, a dock, chargers, and task lighting - then look unfinished because of one problem: cables. The best cable management ideas for desk setups do more than hide wires. They make devices easier to plug in, reduce snag risks, simplify cleaning, and help you find the right cord when something needs attention.
A clean setup does not require an expensive rebuild. Start by identifying where power enters the desk, where devices sit, and which cables need to move. Then use simple organizers where they make the biggest difference.
Start With a Cable Plan, Not More Accessories
Before buying trays, clips, or sleeves, unplug only what you can safely disconnect and look under the desk. Most cable messes come from mixing three different jobs together: delivering power, carrying data, and handling temporary charging. Separate those jobs first.
The power strip and its bulky adapters should usually live off the desktop. Data cables for monitors, Ethernet, USB hubs, and speakers can follow a dedicated route behind the desk or monitor arm. Charging cables need a different approach because they are used constantly. Keep their ends accessible rather than bundling them permanently out of reach.
Measure the distance from each device to the power source before choosing organizers. A cable tray that is too narrow will not hold large power bricks. A cable sleeve that is too short can pull when a standing desk rises. Leaving a little service loop, or controlled slack, makes future changes easier without creating a tangled coil.
Cable Management Ideas for Desk Setups That Work
1. Mount a cable tray under the desktop
An under-desk tray is one of the highest-impact upgrades for a home office, gaming station, or workbench. It keeps the power strip, charging bricks, and excess cord length off the floor and out of sight. This also makes vacuuming easier and keeps pets from treating cords like toys.
Choose a tray with enough depth for your actual adapters, not just the strip itself. Metal trays are a practical option for heavier power supplies. Clamp-on styles suit renters and people who do not want to drill into a desktop, while screw-mounted trays tend to stay more secure on permanent setups.
2. Put the power strip where you can reach it
A power strip hidden too far back solves visual clutter but creates frustration whenever you need to reset an adapter or unplug a device. Mount it under the front edge of the desk, inside a cable tray, or on a side panel where it remains reachable.
Keep ventilation in mind. Do not pack large AC adapters tightly together or cover a power strip with fabric, paper, or a closed storage box. Cable management should make a setup cleaner, not harder to inspect or safer only on the surface.
3. Use adhesive clips for frequently used cables
Small cable clips are ideal for a phone charger, USB-C cable, headset lead, or other cord that repeatedly slips behind the desk. Place them along the desk edge, on the monitor stand, or beside a drawer so the cable end stays exactly where you need it.
Clean and dry the mounting surface first. Adhesive clips work best on smooth, non-textured finishes. For heavier cables or rough wood surfaces, screw-in clips or a clamp-on organizer may be the better long-term choice.
4. Route monitor cables through an arm or raceway
Monitor cables become especially noticeable on multi-screen desks. If your monitor arm includes a cable channel, use it before adding separate accessories. Run the power and display cables together through the arm, then guide them down the rear leg of the desk.
No monitor arm? A slim cable raceway attached along the back edge can create the same visual effect. Leave enough slack near the monitor for height, tilt, and swivel adjustments. A tight cable route can strain a connector when you reposition the screen.
5. Bundle by destination, not by cable type
It is tempting to put every wire into one oversized sleeve. That looks tidy at first, but troubleshooting becomes a chore. Instead, group cables that travel to the same destination: monitor cables in one route, desktop peripherals in another, and power cords in a separate path.
Reusable hook-and-loop ties are better than single-use zip ties for most desk setups. They are easy to reopen when adding a keyboard, swapping a dock, or replacing a failed charging cable. Use zip ties only where the configuration is unlikely to change.
6. Add a charging station at the edge of the desk
A desktop charging station prevents loose USB cables from spreading across the work area. A small dock, stand, or charging organizer gives phones, earbuds, watches, and power banks one predictable home.
This is especially useful in shared offices and family workspaces where several devices appear during the day. Choose cable lengths that reach the charging point without creating a large loop on the desktop. A short cable is usually cleaner, but a slightly longer one may be necessary if the device gets used while charging.
7. Hide the wall-to-desk run
The cable from the outlet to the desk is often the last visible problem. A floor cord cover, baseboard raceway, or vertical sleeve can make that run safer and less distracting. This matters in walkways, near rolling chairs, and in rooms where children or pets have access.
Do not run power cords under rugs or pinch them beneath desk legs. If the outlet is far away, rearranging the desk or using an appropriately rated extension solution is safer than forcing a cord through a high-traffic path.
8. Use a cable box for controlled clutter
A cable box can contain a power strip and adapter bulk when an under-desk tray is not practical. It works well beside a compact desk, behind a media console, or near a printer station. Choose a box with openings that match the direction of your cables so cords do not bend sharply at the exit.
A box is not a cure for overheating or overloaded outlets. It is best for low-profile organization where the strip and adapters remain easy to inspect.
9. Label both ends of critical cables
Labels pay off when a desk includes a docking station, external drive, monitor, router, or multiple chargers. Label both ends of the cables you may need to disconnect. A simple tag reading “left monitor,” “dock power,” or “printer” can save time during an upgrade or move.
This is a small step, but it makes a more technical setup feel manageable. It also prevents the common mistake of unplugging the wrong display or storage device while tracing a cable.
10. Use a vertical cable spine for a standing desk
Standing desks need cables that can move with the desktop. A vertical cable spine, also called a cable chain, guides the bundle from the underside of the desk toward the floor while allowing controlled movement.
Test the desk at its lowest and highest positions before securing anything. The cables should not become taut at full height or pile up on the floor at the lowest setting. A flexible sleeve can work for lighter setups, but a purpose-built spine gives a cleaner result with several cords.
11. Create a separate zone for adapters and bricks
Large laptop chargers, monitor power supplies, and smart-home hubs are the awkward parts of almost every cable setup. Give them a dedicated tray, shelf, or mounted basket rather than trying to force them into narrow clips.
Keep heavy adapters supported rather than hanging from their cords. If a power brick is warm during normal use, make sure air can circulate around it. The goal is neat routing with access for checks and changes.
12. Build in room for the next device
The cleanest desk setups plan for change. Leave one open outlet, one extra USB port, and a little tray capacity if possible. Otherwise, adding a webcam, work light, external drive, or new charger can undo a carefully organized setup in minutes.
For practical accessories ranging from small cable clips to desk-ready power and device gear, VOLTKITS helps make it easier to match the solution to the job without overbuying. Start with the items that address your visible cable paths, then expand only if the setup needs it.
A Simple Desk Cable Checklist
Before you finish, check four things: cables should not pull when the chair moves or the desk rises; power strips and adapters should remain accessible; charging leads should be easy to grab; and no cord should cross a walkway without protection. These checks catch the problems that a clean-looking photo does not show.
A better desk is not one where every cable disappears. It is one where every cable has a route, a purpose, and enough room to do its job. Make one improvement at a time, starting under the desk, and the whole workspace will feel more organized by the end of the day.